Garage door sensor lights are a critical safety feature in modern garages, preventing accidents and property damage by detecting obstacles in the path of a closing door. When these sensors malfunction, your garage door may refuse to close, blink error lights, or behave unpredictably. Understanding how to troubleshoot garage door sensor lights can save you time, money, and frustration, while ensuring your garage remains safe and functional.
In this comprehensive guide, you’ll learn how to identify common sensor issues, interpret indicator lights, and perform step-by-step fixes. Whether you’re a homeowner dealing with a stubborn garage door or simply want to maintain your system, these practical tips will help you restore proper operation quickly.
If you suspect your sensors are out of alignment, you may also want to review the signs of misaligned garage door sensors for additional troubleshooting clues.
Understanding Garage Door Sensor Lights and Their Role
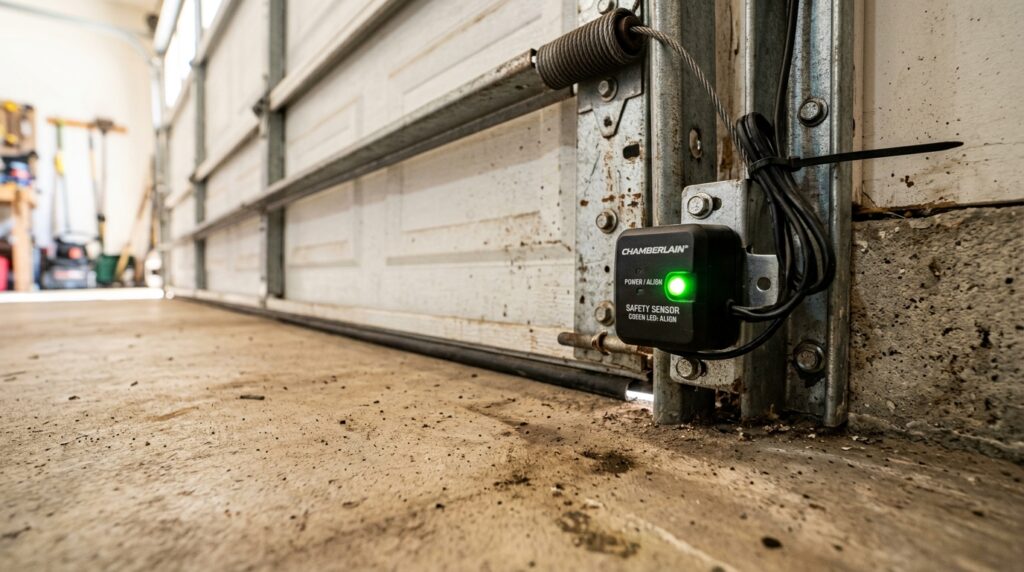
Garage door sensors are typically mounted near the floor on either side of the door. They use an invisible infrared beam to detect obstructions. If something breaks the beam, the door won’t close, and the sensor lights may blink or change color to indicate a problem. These lights provide valuable diagnostic information, helping you pinpoint the source of any issue.
- Solid green or amber light: Indicates the sensor is powered and aligned correctly.
- Blinking or red light: Signals a misalignment, obstruction, or wiring problem.
- No light: Suggests a power issue or faulty sensor.
Common Issues That Affect Sensor Lights
Several factors can cause problems with your garage door sensor indicators. Knowing what to look for is the first step in resolving them. Here are the most frequent culprits:
- Misalignment: Sensors must face each other directly. Even a slight bump can knock them out of alignment, causing the lights to blink or turn off.
- Dirt or debris: Dust, cobwebs, or other obstructions on the sensor lens can interrupt the beam.
- Wiring issues: Loose, frayed, or disconnected wires can cut power to the sensors.
- Sunlight interference: Direct sunlight can sometimes disrupt the infrared beam, especially in the afternoon.
- Physical damage: Sensors may be damaged by impact from tools, bikes, or vehicles.
Step-by-Step Guide: Diagnosing and Fixing Sensor Light Problems
Let’s walk through a practical approach to resolving sensor light issues. These steps cover everything from visual inspection to realignment and cleaning.
1. Inspect the Sensor Lights
Begin by observing the indicator lights on both sensors. Note whether they are solid, blinking, red, green, or off. This will help you determine the nature of the problem.
A solid light on both sensors usually means they are working correctly. If one or both are blinking or off, proceed to the next steps.
2. Check for Obstructions and Clean the Lenses
Remove any objects, dirt, or cobwebs from around the sensors. Use a soft, dry cloth to gently wipe the lenses. Even a thin layer of dust can block the beam and cause the lights to blink.
3. Realign the Sensors
If the lights are still blinking, the sensors may be out of alignment. Loosen the mounting brackets and adjust each sensor so they face each other directly. Tighten the brackets once the indicator lights turn solid.
If you’re unsure about alignment, refer to your garage door opener’s manual for model-specific instructions. For more details on misalignment symptoms, see the earlier linked resource about signs of misaligned garage door sensors.
4. Examine the Wiring
Inspect the wires leading to each sensor. Look for loose connections, frayed wires, or corrosion. If you find any issues, turn off power to the garage door opener and repair or replace the wiring as needed.
5. Test the Door Operation
After cleaning, realigning, and checking the wiring, test the garage door. If the sensors are working, the door should close smoothly, and the indicator lights should remain solid. If problems persist, the sensors themselves may be faulty and need replacement.
Advanced Troubleshooting Tips for Persistent Sensor Light Issues
If basic fixes don’t resolve the problem, try these additional steps:
- Swap the sensors: Switch the sensors from one side to the other. If the issue follows the sensor, it’s likely defective.
- Shield from sunlight: Use a small piece of cardboard or shade to block direct sunlight if it’s interfering with the beam.
- Check the opener unit: Some issues may originate from the garage door opener’s logic board. Consult your manual or contact a professional if you suspect this is the case.
For a more detailed breakdown of troubleshooting steps, you can consult this comprehensive guide to garage door sensor issues.
Preventive Maintenance for Reliable Sensor Performance
Regular maintenance can help prevent sensor light problems before they start. Here are some best practices:
- Clean the sensor lenses monthly to remove dust and debris.
- Check alignment after any accidental bumps or impacts.
- Inspect wiring annually for signs of wear or corrosion.
- Test the garage door safety reversal feature regularly to ensure sensors are functioning.
FAQ: Garage Door Sensor Light Troubleshooting
Why is my garage door sensor light blinking?
A blinking sensor light usually means the sensors are misaligned or something is blocking the beam. Check for obstructions, clean the lenses, and adjust the sensors so they face each other directly.
Can I bypass garage door sensors if they’re not working?
Bypassing sensors is not recommended, as it disables a critical safety feature. Instead, follow the troubleshooting steps above or replace faulty sensors to restore safe operation.
How do I know if my garage door sensor is bad?
If you’ve cleaned, realigned, and checked the wiring but the indicator light remains off or continues to blink, the sensor may be defective. Swapping sensors from side to side can help confirm if one is faulty.
How often should I check my garage door sensors?
It’s a good idea to inspect and clean your sensors monthly, and to check alignment after any accidental bumps or if you notice the door not closing properly.
Conclusion
Addressing issues with your garage door sensor lights doesn’t have to be complicated. By following these troubleshooting steps—inspecting indicator lights, cleaning lenses, realigning sensors, and checking wiring—you can resolve most problems quickly and safely. For persistent issues, consult your opener’s manual or reach out to a professional technician. Regular maintenance will keep your system running smoothly and help you avoid unexpected breakdowns.