Garage door sensors are critical for safety and smooth operation. If your garage door refuses to close or the sensor lights flicker, one often-overlooked cause is loose staples securing the sensor wires. Over time, these staples can loosen, pinch, or even break the wires, leading to unreliable sensor performance or complete failure. Knowing how to check for loose staples on garage door sensor wires can help you quickly identify and fix issues before they become major problems.
In this article, you’ll learn step-by-step methods to inspect, identify, and address loose or problematic staples along your garage door sensor wiring. We’ll also cover why this issue matters, what tools you’ll need, and how to prevent future wiring troubles. If you’re dealing with related sensor issues, you may also find our guide on why is my garage door sensor indicator light missing helpful for broader troubleshooting.
Why Loose Staples Matter for Garage Door Sensor Wiring
Garage door sensors rely on uninterrupted electrical connections to function. The wires running from the sensors to the opener are often fastened to the wall or ceiling with staples. If these staples become loose, they can cause several problems:
- Intermittent Sensor Operation: Loose staples may allow wires to move, causing momentary disconnections or shorts.
- Physical Damage: Staples that are too tight or have shifted can pinch or cut into the wire insulation, leading to exposed wires and potential short circuits.
- Signal Loss: Damaged or loose wiring can disrupt the low-voltage signals that sensors use, resulting in false errors or a non-functioning door.
Addressing staple issues is a simple yet effective way to maintain your garage door’s reliability and safety.
Tools and Materials Needed for Inspection
Before you start, gather these basic tools and supplies:
- Flashlight or headlamp (for visibility along the wire path)
- Flathead screwdriver or small pry bar (to adjust or remove staples)
- Needle-nose pliers (for repositioning or removing staples)
- Replacement insulated staples or cable clips (if needed)
- Electrical tape (for minor wire repairs)
Having the right tools on hand will make the inspection process smoother and safer.
Step-by-Step Guide: Inspecting Garage Door Sensor Wires for Loose Staples
Follow these steps to thoroughly check your sensor wiring for staple-related issues:
- Turn Off Power: For safety, disconnect the garage door opener from power before handling any wires.
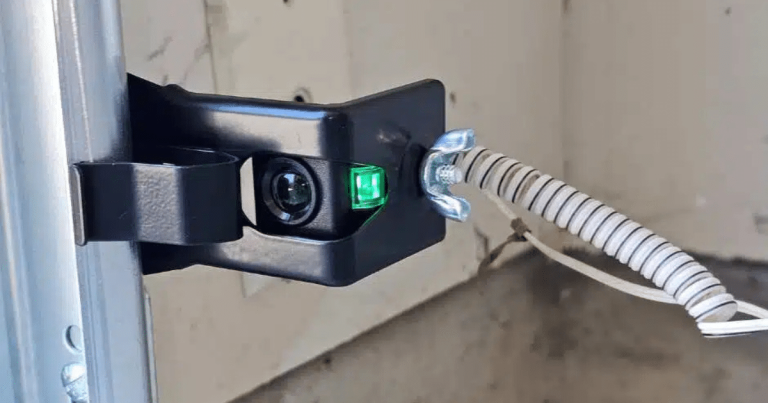
- Locate the Sensor Wires: Find the wires running from each sensor (usually mounted near the bottom of the door tracks) to the opener unit. Trace their entire length, noting where they are stapled to walls or ceilings.
-
Visually Inspect Each Staple: Use a flashlight to check every staple. Look for:
- Staples that are loose or pulling away from the surface
- Wires that move freely under the staple (should be snug but not pinched)
- Any visible damage to the wire insulation near staples
- Gently Test for Movement: Lightly tug the wire near each staple. If the staple moves or the wire slides easily, the staple may be too loose.
- Check for Pinching or Damage: If a staple is too tight, it may have cut into the wire insulation. Look for flattened, nicked, or exposed wires.
- Document Problem Areas: Mark or photograph any staples or sections that need attention.
How to Fix and Prevent Loose Staples on Sensor Wires
Once you’ve identified loose or problematic staples, take these steps to fix and prevent future issues:
- Remove or Adjust Loose Staples: Use needle-nose pliers or a flathead screwdriver to carefully remove any staple that is loose or pinching the wire. Avoid yanking, as this can damage the wire.
- Replace with Proper Fasteners: Use insulated cable staples or plastic cable clips designed for low-voltage wiring. These prevent pinching and reduce the risk of future damage.
- Repair Minor Wire Damage: If you find minor nicks in the insulation, wrap the area with electrical tape. For more severe damage or exposed copper, consider replacing the wire section.
- Secure Wires Snugly: When reattaching, ensure the wire is held firmly but not crushed. There should be no sharp bends or kinks near the staple.
- Test Sensor Operation: Restore power and check that the sensors are functioning. The indicator lights should be steady, and the door should open and close smoothly.
Regularly inspecting and maintaining the wiring can prevent many common sensor issues. For more tips on related problems, see our guide on how to fix garage door sensor mounting on metal studs.

Common Signs of Staple-Related Sensor Wire Issues
It’s not always obvious when staple problems are affecting your garage door sensors. Watch for these warning signs:
- Sensor lights flicker or turn off unexpectedly
- The garage door reverses or won’t close, even when nothing is blocking the sensors
- Visible wire damage or exposed copper near staple points
- Wires hanging loosely or staples visibly out of place
If you notice any of these symptoms, a careful inspection of the wiring and staples is warranted.
Additional Troubleshooting and Resources
If staple and wiring issues aren’t the cause of your sensor problems, consider other factors such as bracket alignment, temperature shifts, or sensor light issues. For example, if your sensor light is turning off and on, our article on why is my garage door sensor light turning off and on provides more targeted troubleshooting steps. For a deeper dive into sensor malfunctions, you can also consult this comprehensive guide to garage door sensor troubleshooting for further insights.
FAQ
What should I do if I find exposed wires under a staple?
If you discover exposed copper or damaged insulation, disconnect power immediately. For minor nicks, wrap the area with electrical tape. For more severe damage, replace the affected wire section to prevent shorts and ensure safety.
How often should I inspect garage door sensor wires and staples?
It’s a good idea to check the wiring and staples at least once a year, or whenever you notice sensor malfunctions. Regular inspections help catch issues early and maintain reliable operation.
Can I use any type of staple or clip to secure sensor wires?
No, always use insulated staples or plastic cable clips specifically designed for low-voltage wiring. Standard metal staples can pinch, cut, or short the wires, leading to sensor failures.
What if fixing the staples doesn’t resolve my sensor issue?
If staple and wiring problems aren’t to blame, check for sensor misalignment, dirty lenses, or bracket damage. For more guidance, see our article on how to fix garage door sensor bracket bending for solutions to physical sensor issues.
Regular maintenance and careful inspection of your garage door sensor wiring can prevent many common problems. By addressing loose staples and related issues, you’ll ensure your garage door operates safely and reliably for years to come.


