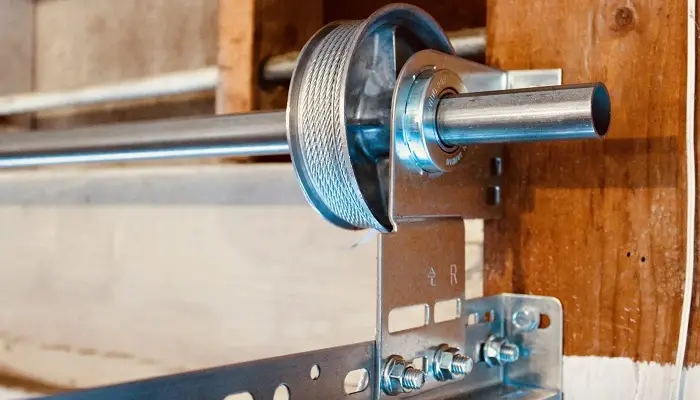
When your garage door cable snaps or frays, having the right garage door cable repair tools is essential for a safe and effective fix. Whether you’re a homeowner tackling a minor repair or a DIY enthusiast looking to save on service costs, understanding the tools and steps involved can make the process smoother and safer. This article covers the essential equipment, safety tips, and step-by-step guidance to help you restore your garage door’s function with confidence.
Before diving into the repair process, it’s important to note that garage door cables are under high tension. Working with them requires caution, the correct tools, and a clear understanding of each step. If you’re unsure or uncomfortable with any part of the repair, consulting a professional is always the safest option. For those ready to proceed, this guide will walk you through what you need and how to use each tool effectively.
For more in-depth technical advice and specifications, you can consult the garage door cable professional guide for expert tips and troubleshooting.
Essential Equipment for Garage Door Cable Maintenance
Having the proper garage door cable repair tools on hand is the first step to a successful repair. Here’s a rundown of the most important items you’ll need:
- Winding Bars: These are critical for adjusting and releasing the tension on torsion springs safely. Never substitute with screwdrivers or other tools.
- Locking Pliers (Vise Grips): Use these to secure the door in place and prevent accidental movement during the repair.
- Socket Set and Wrenches: These are needed to remove and install bolts and nuts on the cable drums and brackets.
- Flathead and Phillips Screwdrivers: Useful for removing panels or covers and for minor adjustments.
- Replacement Cables: Always use cables rated for your specific door type and weight.
- Safety Glasses and Gloves: Protect your eyes and hands from sharp edges and sudden movements.
- Stepladder: A sturdy ladder provides safe access to the upper parts of the door system.
Each of these items plays a vital role in ensuring the repair is completed safely and efficiently.
Preparing for a Safe Repair
Before starting any work, it’s crucial to take the following safety precautions:
- Disconnect Power: Unplug the garage door opener to prevent accidental activation.
- Secure the Door: Use locking pliers to hold the door in place and prevent it from falling.
- Release Tension Carefully: If your door uses torsion springs, use winding bars to release the tension slowly and safely.
- Inspect All Components: Check for worn or damaged parts that may also need replacement during the repair.
Taking these steps minimizes the risk of injury and ensures a smoother repair process.
Step-by-Step Guide to Replacing Garage Door Cables
Once you’ve gathered your garage door cable repair tools and taken all safety measures, follow these steps to replace a broken or frayed cable:
- Open the Door Fully: If possible, open the door to relieve tension on the cables. Secure it with locking pliers.
- Release Spring Tension: For torsion spring systems, insert winding bars into the winding cone and carefully unwind the spring. For extension springs, disconnect the safety cable and unhook the spring.
- Remove the Old Cable: Use your socket set or wrench to loosen the set screws on the cable drum. Slide the drum away and remove the damaged cable.
- Install the New Cable: Attach the new cable to the bottom bracket and thread it up to the drum. Ensure it sits properly in the drum grooves.
- Tighten and Test: Re-tighten the drum set screws, rewind the spring tension, and check the cable alignment. Remove the locking pliers and test the door’s movement by hand.
For a detailed walkthrough, you may find this step-by-step cable replacement guide helpful, especially if you’re new to garage door repairs.
Common Issues and Troubleshooting Tips
Even with the right garage door cable repair tools, you may encounter some challenges during the process. Here are a few common issues and how to address them:
- Cable Slips Off Drum: This usually happens if the cable is not wound tightly or evenly. Rewind the cable, ensuring it sits snugly in the drum grooves.
- Uneven Door Movement: Check that both cables are of equal length and properly tensioned. Adjust as needed using your winding bars and pliers.
- Frayed or Rusty Cables: Always replace cables showing signs of wear. For prevention, see this garage door cable corrosion prevention guide for maintenance tips.
- Persistent Noises: Lubricate moving parts with a garage door lubricant and inspect for misaligned hardware.
Regular maintenance and prompt repairs help extend the life of your garage door system and reduce the risk of sudden failures.
Pro Tips for Prolonging Cable Life
Proper care and routine checks can help you avoid frequent repairs. Consider these maintenance strategies:
- Lubricate Regularly: Apply a silicone-based lubricant to cables, pulleys, and springs every few months.
- Inspect for Wear: Look for fraying, rust, or kinks during seasonal checks. Early detection prevents major failures.
- Upgrade Components: If your door is older, consider a garage door cable system upgrade for improved reliability and safety.
- Protect Against Moisture: Moisture accelerates corrosion. For solutions, see this guide on moisture damage and rust fixes.
- Seasonal Maintenance: Adjust your care routine for winter and summer. For detailed advice, check the seasonal maintenance guide.
Staying proactive with maintenance not only extends the lifespan of your cables but also enhances the overall safety and performance of your garage door system.
Frequently Asked Questions
What are the most important tools for repairing garage door cables?
The most essential items include winding bars, locking pliers, a socket set, screwdrivers, safety gear, and the correct replacement cables. Using the right garage door cable repair tools ensures both safety and effectiveness during the repair process.
Can I replace garage door cables myself, or should I hire a professional?
Many homeowners can replace extension spring cables with the right tools and instructions. However, torsion spring systems are more dangerous due to high tension. If you’re unsure or uncomfortable, it’s best to consult a professional to avoid injury.
How often should I inspect or replace my garage door cables?
It’s recommended to inspect cables at least twice a year, especially before winter and summer. Replace cables immediately if you notice fraying, rust, or kinks to prevent sudden failures and potential accidents.
Where can I find reliable guides and more information on cable repairs?
For comprehensive technical advice, the garage door cable professional guide offers detailed tips, while the external step-by-step guide provides practical instructions for DIY repairs.
With the right preparation, tools, and safety measures, you can address most garage door cable issues confidently. Regular maintenance and timely repairs will keep your system running smoothly and safely for years to come.