Garage door sensors play a crucial role in ensuring the safety and smooth operation of your garage door. When the sensor brackets become misaligned, your door may refuse to close, reverse unexpectedly, or display blinking lights. Learning how to fix garage door sensor bracket alignment can save you time, money, and frustration. This article provides a step-by-step approach to diagnosing and correcting misalignment issues, along with tips for maintaining reliable sensor performance.
If you’re dealing with mounting challenges on metal studs, you may also find this guide on how to fix garage door sensor mounting on metal studs helpful for more specific installation scenarios.
Understanding Garage Door Sensor Alignment Issues
Garage door sensors, typically located near the base of the door tracks, use an infrared beam to detect obstructions. When the brackets holding these sensors are bumped, loosened, or bent, the beam can become misaligned. This misalignment prevents the sensors from communicating properly, causing the door to malfunction or refuse to close.
Common symptoms of sensor bracket misalignment include:
- The garage door reverses immediately after attempting to close.
- Indicator lights on the sensors are blinking or off.
- The door only closes when you hold down the wall button.
Addressing these problems quickly helps prevent further damage and ensures your garage door remains safe to use.
Tools and Materials Needed for Sensor Bracket Adjustment
Before starting the alignment process, gather the following tools and materials:
- Phillips or flathead screwdriver (depending on your sensor bracket screws)
- Measuring tape or ruler
- Level (bubble or laser)
- Soft cloth for cleaning sensors
- Replacement screws or brackets (if existing hardware is damaged)
Having these items on hand will make the process more efficient and help ensure a secure, accurate adjustment.

Step-by-Step Guide to Adjusting Sensor Brackets
Follow these steps to restore proper alignment to your garage door sensor brackets:
-
Disconnect Power for Safety
Before working on the sensors, unplug your garage door opener or switch off the circuit breaker. This prevents accidental activation while you’re making adjustments.
-
Inspect the Sensor Brackets
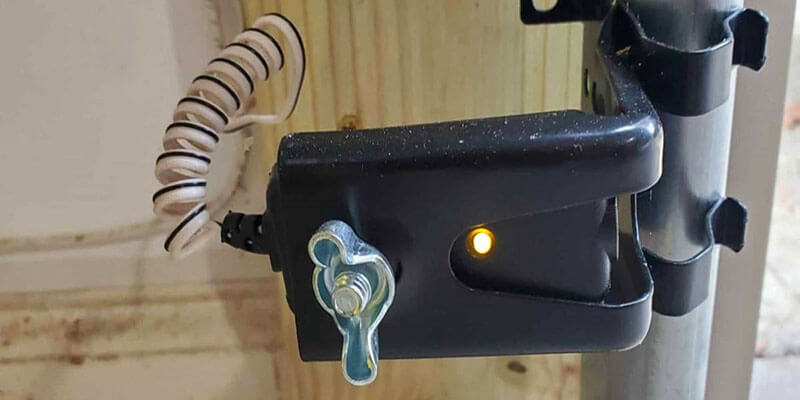
Check both sensor units—usually one has a green light (receiver) and the other an amber or yellow light (transmitter). Look for bent brackets, loose screws, or visible obstructions. Remove any dirt or cobwebs from the sensor lenses using a soft cloth.
-
Loosen the Bracket Screws
Using the appropriate screwdriver, gently loosen the screws holding each sensor bracket. This will allow you to adjust their position without removing them entirely.
-
Align the Sensors
Use a level to ensure both sensors are at the same height on either side of the door. Most manufacturers recommend placing sensors 4–6 inches above the floor. Adjust the brackets so the sensors face each other directly across the opening.
-
Tighten and Test
Once the sensors are properly aligned, tighten the screws to secure the brackets. Plug the opener back in or restore power. Check the indicator lights—both should be solid (not blinking) if alignment is correct. Test the door’s operation by closing it with the remote or wall button.
-
Fine-Tune if Needed
If the door still malfunctions or the lights blink, repeat the alignment process. Small adjustments can make a significant difference. If the brackets are damaged or won’t hold position, consider replacing them.
For additional troubleshooting, you can consult resources like this detailed guide on testing faulty garage door sensors to help identify persistent issues.
Common Causes of Sensor Bracket Misalignment
Understanding why sensor brackets become misaligned can help prevent future problems. Some frequent causes include:
- Accidental bumps from bikes, tools, or vehicles
- Vibration from frequent door use loosening screws
- Improper installation or use of incompatible mounting hardware
- Environmental factors such as extreme temperature changes causing metal expansion or contraction
Regularly checking the tightness of the brackets and keeping the sensor area clear can help maintain reliable alignment.
When to Seek Professional Help
While most sensor bracket alignment issues can be resolved with basic tools and a careful approach, some situations may require professional assistance. Consider calling a garage door technician if:
- The sensors remain unresponsive after repeated alignment attempts
- Wiring appears damaged or frayed
- The brackets or mounting surfaces are broken beyond repair
- You’re uncomfortable working with electrical components
In some cases, more complex issues such as faulty transmitters or wiring problems may be the root cause. For more information on related troubleshooting, see this article on why is my garage door sensor transmitter dead.
Preventive Maintenance Tips
To keep your garage door sensors working reliably, follow these maintenance practices:
- Inspect sensor brackets monthly for looseness or misalignment
- Clean sensor lenses with a soft cloth to remove dust and debris
- Check for blinking indicator lights and address issues promptly
- Ensure the area around the sensors remains clear of obstacles
- Test the door’s safety reversal feature regularly
By making these checks part of your routine, you can avoid unexpected malfunctions and extend the life of your garage door system.
Frequently Asked Questions
How can I tell if my garage door sensors are out of alignment?
Typical signs include a blinking indicator light on one or both sensors, the garage door reversing when trying to close, or the door only closing when you hold down the wall button. Visually inspect the sensors to see if they are facing each other directly and are mounted at the same height.
What should I do if aligning the brackets does not fix the problem?
If realigning the brackets doesn’t resolve the issue, check for dirty lenses, damaged wiring, or faulty sensors. Sometimes, the problem may be with the opener’s logic board or power supply. If you’re unable to identify the cause, consult a professional technician for a thorough inspection.
Can I use electrical tape to secure loose sensor wiring?
Yes, electrical tape can be used to temporarily secure or insulate loose wires. For a more permanent fix and additional tips, refer to this guide on how to fix garage door sensor wiring using electrical tape.
Why does my garage door sensor light blink twice?
A sensor light blinking twice often indicates a communication error or obstruction. For a detailed explanation and solutions, see this resource on why is my garage door sensor light blinking twice.
Conclusion
Properly aligned garage door sensor brackets are essential for safe and reliable door operation. By following the steps outlined above, you can quickly diagnose and correct most alignment issues yourself. Regular maintenance and awareness of common causes will help prevent future problems. If you encounter persistent difficulties, don’t hesitate to seek professional assistance to ensure your garage door system remains safe and functional.