Garage door sensors are essential safety devices that prevent the door from closing when something is in its path. However, when these sensors malfunction, your garage door may refuse to close, leaving you frustrated and searching for solutions. In some cases, you may need to temporarily bypass the sensor to test the opener or diagnose the root cause of the problem. This guide will walk you through how to bypass garage door sensor for testing safely and effectively, while also highlighting important safety precautions and troubleshooting steps.
It’s important to note that bypassing a garage door sensor should only be done for troubleshooting purposes. Never leave your garage door in a bypassed state, as this disables a critical safety feature. If you are experiencing persistent issues, consider reviewing related topics such as why is my garage door sensor indicator light missing or how to fix garage door sensor mounting on metal studs for more targeted solutions.
Understanding Garage Door Sensors and Why They Matter
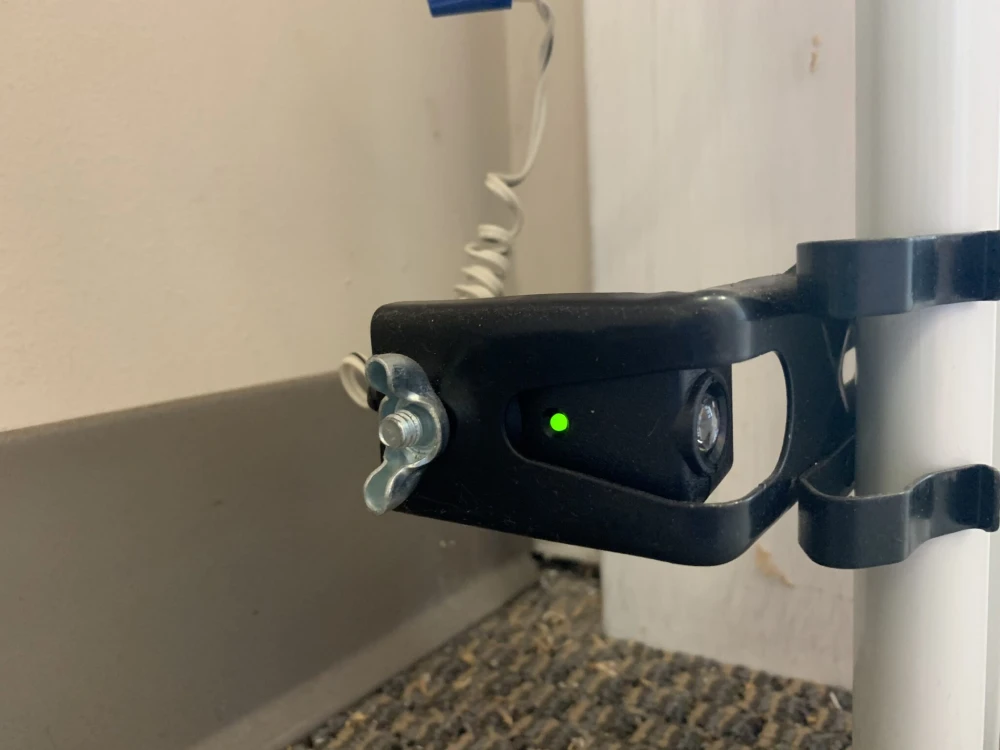
Garage door sensors, also known as photo-eye sensors, are mounted near the base of the door tracks on either side. They work by sending an invisible infrared beam from one sensor to the other. If the beam is interrupted, the opener will not close the door. This system is designed to protect people, pets, and objects from being accidentally crushed by the door.
Common issues with sensors include misalignment, dirt or debris blocking the beam, wiring problems, or sensor failure. Before considering a bypass, always check for these simple problems first. If you notice the indicator lights are off or blinking, consult resources like why is my garage door sensor light turning off and on for more detailed troubleshooting steps.
When Should You Bypass the Sensor?
Bypassing the sensor is only recommended for short-term testing or troubleshooting. For example, if your door refuses to close and you have already checked for obstructions, cleaned the lenses, and ensured the sensors are aligned, a bypass can help determine if the sensors are the source of the problem. Never use a bypass as a permanent fix, as this will compromise the safety of your garage door system.
Some scenarios where a temporary bypass may be useful include:
- Testing the garage door opener after sensor troubleshooting
- Diagnosing wiring or logic board issues
- Confirming if the sensors themselves are faulty
If you live in a region with extreme temperatures, you may also want to review how to troubleshoot garage door sensor issues in summer for seasonal sensor problems.

Step-by-Step Guide: Safely Bypassing Garage Door Sensors for Testing
Follow these steps to temporarily bypass your garage door sensors for diagnostic purposes. Remember, this method is for how to bypass garage door sensor for testing only and should not be used as a long-term solution.
-
Unplug the Garage Door Opener:
Before working on any electrical components, disconnect the power to your garage door opener to avoid electric shock.
-
Locate the Sensor Wires:
Find the two sensors mounted on either side of the door, near the floor. Follow the wires from each sensor to where they connect to the opener or wiring terminals.
-
Disconnect the Sensors:
Gently disconnect the wires from the sensors or from the opener’s terminal block. Take note of which wire goes where, as you’ll need to reconnect them later.
-
Bypass the Sensors:
To bypass, twist together the two wires that connect to the sensor terminals on the opener (typically the white and black/white wires). This creates a closed circuit, simulating a clear path between the sensors.
-
Restore Power and Test:
Plug the opener back in and try closing the garage door using the wall button. If the door closes, the issue is likely with the sensors or their alignment. If not, the problem may lie elsewhere in the opener system.
-
Reconnect the Sensors:
Once you have completed your testing, immediately restore the original sensor wiring. Never leave the sensors bypassed after troubleshooting.
For a visual reference or additional troubleshooting, you can check out guides like how to reset garage door sensors for step-by-step instructions.
Precautions and Safety Tips
Bypassing your garage door sensors disables an important safety feature. Always follow these precautions:
- Only bypass for short-term troubleshooting, never for daily use.
- Keep children and pets away from the garage door during testing.
- Restore the sensors to full operation as soon as possible.
- If you are unsure about any step, contact a qualified garage door technician.
For issues related to sensor mounting or bracket damage, refer to how to fix garage door sensor bracket bending for repair tips.
Common Mistakes to Avoid When Testing Garage Door Sensors
Many homeowners make errors when attempting to bypass or troubleshoot their garage door sensors. Here are some pitfalls to watch out for:
- Forgetting to unplug the opener before working on wiring
- Leaving the sensors bypassed after testing
- Not properly noting wire positions, leading to confusion during reassembly
- Overlooking simple issues like dirty lenses or loose brackets
Taking a methodical approach and documenting your steps can help prevent these mistakes and ensure a safe, successful troubleshooting process.
Restoring Sensor Function and Next Steps
After completing your tests, always restore the sensors to their original configuration. If your garage door still does not operate correctly, further investigation may be needed. Consider checking for:
- Damaged or frayed wires
- Faulty logic board in the opener
- Obstructions or misalignment of the sensor lenses
If troubleshooting does not resolve the issue, it may be time to replace the sensors or consult a professional. For new sensor lights or replacements, you can buy garage door sensor lights from reputable suppliers.
Frequently Asked Questions
Is it safe to bypass garage door sensors?
Bypassing garage door sensors is not safe for regular use. It should only be done temporarily for troubleshooting. Always restore the sensors immediately after testing to ensure your garage door system remains safe for your family and pets.
What if my garage door still won’t close after bypassing the sensors?
If the door does not close even with the sensors bypassed, the problem may be with the opener’s logic board, wiring, or another component. In this case, further diagnosis or professional repair may be required.
Can I permanently bypass the sensors?
No, permanently bypassing the sensors is not recommended and may violate safety codes. The sensors are a critical safety feature designed to prevent injury and property damage. Always restore them after testing.
How do I know if my sensors are misaligned?
Most sensors have indicator lights that show alignment status. If the lights are off, blinking, or different colors, the sensors may be misaligned or blocked. Adjust them until both lights are steady and consult your opener’s manual for specific troubleshooting steps.
Understanding how to bypass garage door sensor for testing can help you quickly diagnose problems with your garage door system. Remember to prioritize safety, follow the steps carefully, and restore your sensors as soon as possible. For more detailed repair guides and troubleshooting tips, explore the related articles linked throughout this guide.


